Tuesday, March 30, 2021

Allowing for the Process

The process of bugs eating wood.

 To start with nothing and go towards having something is a process.  It's never ever a straight line from here to there.  Wanders here, stops there, restarts over there, circles here.  I know this, it's a beautiful thing really.  To me, there's nothing better than thinking you know where it's going to end and you end up in a whole new universe.

So when my first round of sketches for the winery table wasn't exactly what they were looking for, it wasn't unexpected at all.  It wasn't a negative but a positive.

I really think most things in life are neutral in value.  It's how you view them that places the value on them.  I tend towards the positive always.  To do more thinking and sketching for a different direction of the table was nothing but golden.

 Please note that I said, most things in life are neutral.


As is the tradition, I start one part of the process with a hand tool.


And talk about a process.  Each and every piece of wood was it's own entity that required a comprehensive approach to it.  This wood was feral in the true sense.  Wild, untamed, attitude.  The bugs went positively medieval on it.  Infested heavily in the sapwood.  Not a negative in my mind.  Super interesting.  Chunks of wood were missing that required a surgeon's approach to fix it up.


The final three slim pieces came from the last board.


Some of the large cut off ends.


Finally the individual pieces have been massaged, stitched, re-sawed and glued back, and thickness planed to finally dimension.  Now to cut to length and cut the joints.


Tuesday, March 16, 2021

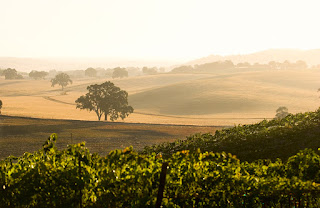
Le Terroir of El Paso de Robles

 How's that for three languages used in the title.

This notion, le terroir, that the totality of the environment is concentrated into each glass of wine of the region it comes from. 


It's the dirt and what made that dirt.


It's the fog and the rain and the temperature.


The Sun and The Moon.


In the flora.


And of course.


This is the first time I can actually see and feel the land that the wood came from.  I can feel Paso in it.  I can see Paso in the air when I work the wood.  Haven't seen dust like that come off of any other wood.

It’s pure Paso.

Not that I really have that much heft in Paso Robles but I've been photographing vineyards down there since 2006. I wasn't born there, I don't live there.  But I think when you have spent 15 years photographing a region it starts to implant in your DNA.  It's a lot time standing in pre dawn, in the morning, afternoon.  It's a lot of sunrises and sunsets. It's a lot of feeling the heat and the cool and the dust in the air. I sometimes sleep out in the vineyards during shoots just to get as close as I can to their essence.

So when I first opened up the wood it was like seeing the whole terroir of Paso right there.  It's visceral.


At this point I'm waiting to hear back on the sketches before doing any more.

Some process photos here.

12'x24"x 3" I screwed together as a base to run the slabs through the planer


The stack of base and slab had some weight for sure.  One of the nice things about this planer is it has (as an option) the ability to reverse the direction of the drive.  Normally on a planer you have to take the piece out the back and transport to the front to run it through again.  Here, I would turn off the blade and reverse it back through the machine without needing to muscle anything. On this machine, the cutting and drive are two separate mechanisms.  And the drive is infinitely adjustable in speed.  On a particularly knotty area I can slow down the drive right there to increase the cuts per inch on the knot.

I didn't like the factory's in and out arrangement tables on the planer so I got rid of them and put on these rollers.  My method of keeping them level with the planer bed.

A laser pointer on the bed.


Pointing at a level mark on a stick at the end of the rollers. I'm showing you the dot in the middle but I use it by pointing at each corner of the roller.


Alright folks.  That's it for the moment.


Oh.  Talk about how history and terroir have coexisted making wines in one region for 6000 years.  I'm almost though with a fascinating book (at least to me it is) of wines from Mount Etna in Sicily.  You can really get a sense of how everything, the active volcanoes, it's soil, the altitude, the distance from the sea all come together in a unique wine.

The New Wines of Mount Etna by Benjamin North Spencer (a transported Californian by the way)


Bonus Project!!

 I've been using Japanese water stones to hand sharpen since about 1975.  So I can do that.

Also have a powered water cooled slow RPM grinder.  I'm not tied to any one sharpening system.

Not sure when I came upon this, probably in the mid 80's, it's a hand jig. Brian Burns came out with a little booklet and jig. I immediately adopted the double bevel concept to the jointer and planer blades.  No tear out, I've not looked at how I orient the grain when pushing it through the machines since then.

Built his stone holding box but modified it a bit.  Instead of the stones sitting on screws, I put cams under the stones to push them up to a reference point that didn't move.

After 30 years I took it apart to improve on the cam system.  That's the old one above.

This time around I used the age old idea of wedges to push up the stones.


The jig that Brian sold was the heart of the whole thing.  It's wide stance makes it rock steady.  You can hone a 1/8" chisel perfectly without rocking or digging into the stone.  Also you see the cut out on the jig, you can put gooseneck chisels in there.  You can sharpen scraper plane blades with their super high angles because of the wide stance and holding ability.


 You make this little jig to place the blades away at a consistent distance, so once the sharpening angle has been decided, everything is repeatable.

Email buddy, BikerJen, tells me Brian no longer sells the metal jig.

Wednesday, March 3, 2021

2! 2 Posts in 1.

 Lots of pics for the visual people out there.


Rented a truck and trucked down to Paso Robles in Central CA to pick up some wood.  The winery table is going to be made from trees that came from the land the winery owns.  Real nice land to table story there.

So it's not quite the way Evan's sawmill stacks wood, that's ok.  It was covered, so it's got that going for it.  And it's authentic as hell, coming from the dry, dusty and hot as hell in the summer Paso, so it's got that going for it too.  And I know it's going to be beautiful wood under that grayness.


Mike the measurer totaling up the board feet.


Got it back to Oakland and saw that the wood had some borer type insects inside.  I wrapped the stack in plastic and set off some fumigation bombs inside.


Let it sit for a couple weeks and opened it up.  Fresh little piles of sawdust so that approach did not work

Moved the stack down to an urban sawmiller 5 blocks from me that has a bug killing kiln.  They bring the temperature up to 180F/82C for a couple days.

Picking it on Friday.  So I think I'll do some actual work on that project then and put down the below project for awhile.  I'm at a natural stopping place anyway.


Kitchen cabinets.

Look at how big the pores are.  I cut to final width a door and this is the offcut.

Fresh two part epoxy filling a knothole.  We are currently in the trend of allowing for defects in wood that a couple decades ago would have been unacceptable.  Who knows, a hundred years from now they'll be shaking their heads at us trying to figure out why we thought splits, cracks and holes were considered beautiful.


For the past week, I've been making the handles.  I cold forged round steel giving it at texture, each handle was done from a different thematic philosophy.  Wrapped them in copper wire that came from when the studio was seismically upgraded a couple years ago.  This was either pounded on after it was wrapped or before.  I decided to do each one, one by one rather then on a "production line" approach. 


This part of the handle finished.


Threaded inserts in the handle holders.  This will be how they are attached to the doors or drawers.


Textured up the other side using this type of chisel.  Kept a broken polishing stone right next to where I was working and honed the edge after each one.  Such a big difference from razor sharp to being r a z o r sharp.

Each received a dipping into some super blonde and put in the "drying rack".


Throwing them on the handle parts as they become dry.


18 handles mean 36 handle holders.

Drilled then drove in a copper nail, cut off the head and peened it over

 Handles done.


Friday, I'll move from this small scale to a much bigger scale of flattening the big Walnut slabs.